Footage filmed on a DSLR automatically has the H.264 codec, which isn't a cutting codec because it is too compressed. The first thing that you need to do when importing this importing is take it onto MPEG Streamclip and transcode it to the Apple ProRes 422 codec, keeping the quality at 100%. This will make the file size almost 2.5 times the original but uncompresses the footage, making it a lot smooth to work with in the edit.
I learnt about how footage is compressed using the binary code. When footage isn't compressed, the binary code of a pixel could be 100111101 for example. When the same pixel is compressed, the code would look like 100(4)101, grouping all of the 1's that are together in a bracket to keep the code smaller. However, this causes problems in the edit because the program has to take all of the 1's out of the brackets, meaning that the program has a lot more work to do. So converting the footage to Apple ProRes 422 and uncompressing it all helps the edit run a lot smoother.
I also learnt about the use of the batch list in MPEG Streamclip. On the menu at the top of the screen, there is List menu, and under that menu there is a Batch List option. This means that you can add more than one file to the program and it will create a list of jobs to do. This is very helpful to save time so that you don't have to transcode each bit of footage separately. I was told never to check the 'Fix Timecode Breaks' option because this would cause problems in the edit and also it is good to see yourself where any timecode breaks are so you can fix them yourself.
I was given a piece of advice because transcoding can take so long, and that was to use more than one computer to transcode with. This makes a lot of sense because if you had a job that would take 4 hours to complete, doing it on 2 separate computers would mean that it would only take 2 hours to complete, saving a lot of time.
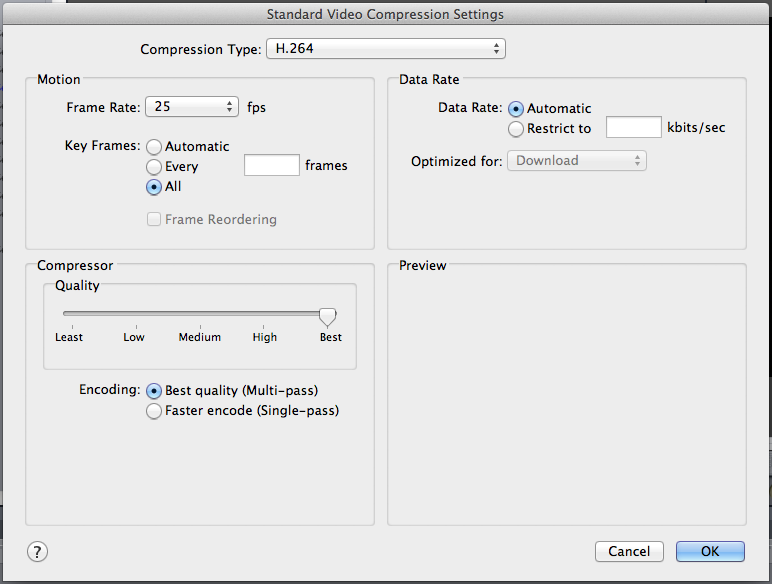
After looking at importing the footage, we also looked at exporting it. In Final Cut Pro, the settings that should be used when exporting HD footage I had included in the screenshots below.

After we had been through HD Importing and Exporting, we were given the task as a class to come up with 100 things we all know about editing and also to get on with our blogs whilst Chris was doing blog reviews.
My blog review was very helpful because Chris gave me a lot of positive feedback and also let me know what extra I need to do. This was to include more of my own opinion on films that I had watched. I also realised when looking through the blog that my post about Chromakey vs Lumakey needs more information adding to it because the section on Lumakey isn't very informative.
Finally, just before the end of the session, we looked at a scene from the TV show, Breaking Bad, and the use of music in this scene. The scene was a montage with a Beatles music track over the top of it and I thought that it worked very well. The man put the record on in his room while he was relaxing and then we cut to a short scene of a lady in a car drawing a love heart on the window for the man in the next car who she was having an affair with before rolling the window down to rub it off. We then cut back to the man in the room relaxing and he took the music off play because it was all getting too much for him. I think this worked very well as a piece.
Overall, I thought todays session was very useful and I learnt a lot about HD importing and exporting and also my blog review was very useful to help me improve my blog.
No comments:
Post a Comment